Tag Archives: gnome

Quick gnome tweaks

Here are some tweaks for your gnome:

Print all subdirectories and entries under a dir, recursively:

Change GDM font:

Change GDM backgound:

Turn off or limit the Recent Documents feature in Ubuntu

If you want to turn off the Recent Documents feature in Ubuntu, all you have to do is create a .gtkrc file in your home directory.

Then add gtk-recent-files-max-age=0 to this file.

This is documented here.
This will also work in any other linux distribution running Gnome.
Enjoy!

How to fix menu icons in GNOME 2.28

In the latest release of GNOME, they decided to turn off icons in menus by default. This is ugly and if you ask me, not practical at all.
However, you can get those icons back by going to System → Preferences → Appearance, and under the Interface tab, you can check the box “Show icons in menus”. The new GNOME also removes stock icons from buttons. The the above option does not put them back.
To enable icons in menus and butttons, run in your terminal:

Before:
before_2009-10-05-085517_1120x832_scrot before_2009-10-05-085452_1120x832_scrot
After:
after_0-05-085605_1120x832_scrot after_0-05-085554_1120x832_scrot

Remove all settings for Evolution

Here is a small script to remove all your Evolution settings:

Next time you open Evolution, you will be prompted to add a new account.

Clear ALT+F2 history in Gnome

Use this command in your terminal to clear the “Run Program” dialogue box invoked by ALT+F2 in Gnome:

Ctrl+Alt+Del to open System Monitor in Ubuntu

If you want to enable Ctrl+Alt+Del to open System Monitor you have to do this:

Go to System->Preferences->Keyboard Shortcuts and search for “Logout” action (that is under Desktop actions) and you will see that Ctrl+Alt+Del combination is associated to Logout shortcut.
You have to click on that shortcut and press Backspace if you want to disable it or choose another combination.
Close this and open the Configuration Editor (if you have installed it you will find it under Applications->System Tools; or just run gconf-editor).
– On left tree select: apps->metacity
– Select “Global_keybindings” and search for a “run_command_X” value where X is between 1 and 12 and it is not used
– Add this value: <Control><Alt>Delete
– Now select “Keybindings_commands” on left tree. Goto “command_X” where X is the same number selected in run_command_X option.
Add this value: gnome-system-monitor

Alternative solution (I prefer this one):
Run in terminal:

Install Nodoka (Fedora theme) on Ubuntu (II)

I was explaining here how to install Nodoka theme on Ubuntu.
Or you can use this small script I made to automate this.

PS: You need to have libsexy-dev installed. If not, just run this command in your terminal:

I hope you’ll find it usefull.
Here is the script:

Enable/Disable GDM in Ubuntu

By default Ubuntu Loads Gnome GUI.
If you need to disable X.org / Gnome under Linux, so you can get text only login, this is the right guide to follow.

Using command line (CLI):
Ubuntu comes with rcconf and update-rc.d command.
rcconf allows you to control which services are started when the system boots up or reboots. It displays a menu of all the services which could be started at boot.
The ones that are configured to do so are marked and you can toggle individual services on and off.
Install rcconf:

Now start rcconf:

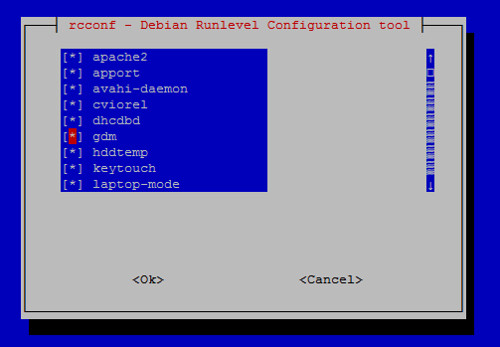
Now you will be prompted for the administrator password, this is necessary because the changes done with this tool will affect the whole system. After entering the administrator password, the following text based window is displayed on screen:rcconf
Next enable/disable GDM service by pressing space bar (check the checkbox) > Click OK to save the changes.

Using GUI tools:
The Services Administration Tool allows you to specify which services will be started during the system boot process.
You can type the command:

Or just click on System -> Administration -> Services
Again you will be prompted for the administrator password, this is necessary because the changes done with this tool will affect the whole system. After entering the administrator password, the following window is displayed:

ubuntu-linux-services
Make sure you remove GDM (Gnome login manager) by disabling the the checkbox and close the window.

Alternative method (wich seems to be a better approach):

Enabling Temperature Sensors in Ubuntu

Most computers these days come with a myriad of sensors to monitor the temperature of your computer. These sensors are generally located on the processor and the motherboard, and you might also have sensors on your video card. On top of that, all S.M.A.R.T-enabled hard drives have built-in temperature monitoring.
I can show you the steps to enable the temperature sensors in your computer in Ubuntu, or any other version of Linux.
1. Installing the sensor libraries
First thing’s first – you need to install the libraries that allow Linux to read your sensors. To do this, install the lm-sensors library, by running the command:
sudo apt-get install lm-sensors
This will install the libraries for your motherboard’s sensors. For your hard-disk sensors, you’ll want to install hddtemp:
sudo apt-get install hddtemp
In Ubuntu, the install will ask you several questions. Do not be scared, the default settings should work.

2. Running sensors-detect
Now that your sensor libraries are installed, you need to detect your sensors! Run the command:
sudo sensors-detect
Which will probe your system for sensors. Answer “YES” to all questions! Don’t just hit enter, type “YES”, because at the end there will be a question for which the default answer is “no”, and we’ll want to answer in the affirmative.
You willbe asked, at some point, “Do you want to add these lines to /etc/modules automatically? (yes/NO)” This is the question we want to make sure we answer YES to.

3. Loading the modules
Since we answered YES to the previous question, our sensor modules will be loaded by default the next time we start up. But since we don’t want to have to reboot, we’re going to use the information we got from the sensors-detect script to load the modules ourselves, this time only. Right above the last question will appear a list of modules that you should load, in the form of:

#—-cut here—-
# Chip drivers
smsc47m1
#—-cut here—-

You may have more, or different, items listed – that’s fine! What we want to do now, to load these modules, is use the modprobe command, as follows:
sudo modprobe [module name]

4. Monitoring the sensors!
Wow, that was a lot of work! Now, let’s see the rewards. On the command line, you can simply run:
sensors

However, we’d rather have a graphical interface for checking up on our hardware, so let’s install an applet for our Gnome desktop to keep an eye on our system’s temperature. Run the command:
sudo apt-get install sensors-applet
to install the applet. Now, add the applet by right-clicking on your desktop panel, selecting “Add to Panel,” and you will now see a “Hardware Sensors Monitor” applet in the System & Hardware section. Click and drag this to your panel to add it.
My experience with Ubuntu 8.04 Hardy Heron Beta

After a few tests with the new beta from Ubuntu, I decided to write some of my thoughts about this release.
Please note that this is a BETA release, has many unresolved bugs and needs to be polished before the final release.
Overall, everything seems better. A new host-based firewall application, the new Vinagre VNC client, Firefox 3 Beta 4 replaces Firefox 2 as the default browser, PulseAudio is now enabled by default, PolicyKit is now integrated in the administrative user interfaces, linux kernel 2.6.24, Xorg 7.3, GNOME 2.22, a few new compiz plugins.
In my opinion, there is a downside in this release regarding the PulseAudio sound server. Some non-GNOME applications still need to be changed to output to pulse/esd by default and the volume control tools are not yet integrated. Users with Audigy1 sound cards will be suprised to find out that the 5.1 output is not so good as it was in ALSA. It will be very difficult for a beginner to configure by hand the audio for best results in sound quality.
Anyway, many of this bugs will be resolved until the final release. Can’t wait!

  • Page 1 of 2
  • 1
  • 2
  • >